- Home
- Portrait Drawing
- How to Draw Hair
How to Draw Hair (Realistically!)

Learning how to draw hair can feel like an ever-changing, daunting
task at first. Hair varies so much from hairstyle to hairstyle that it requires us to be flexible in our approach. In this step by step hair drawing tutorial I'll present
concepts to help you problem solve your way through all of your hair drawing
sagas.
To get the most out of this lesson, take my free Mini-Course on the essential concepts of realistic drawing. These video lessons will give you a framework, or 'order of operations', for approaching drawings of any subject matter, including hair.
Finally, don't miss the downloadable hair drawing infographic at the bottom of the page, as well as this braid drawing tutorial!
In this lesson you will learn:
- How to simplify such a complicated subject as hair
- How to draw hair that looks like your model's without obsessing over every detail
- Tips for designing hair that leads the viewer's eye around the drawing
- How to draw realistic, dimensional locks
And, of course, I will show you the step by step process of creating the drawing above!
F R E E D O W N L O A D
At the end of this article, download a free How to Draw Hair Infographic!
How to Draw Hair
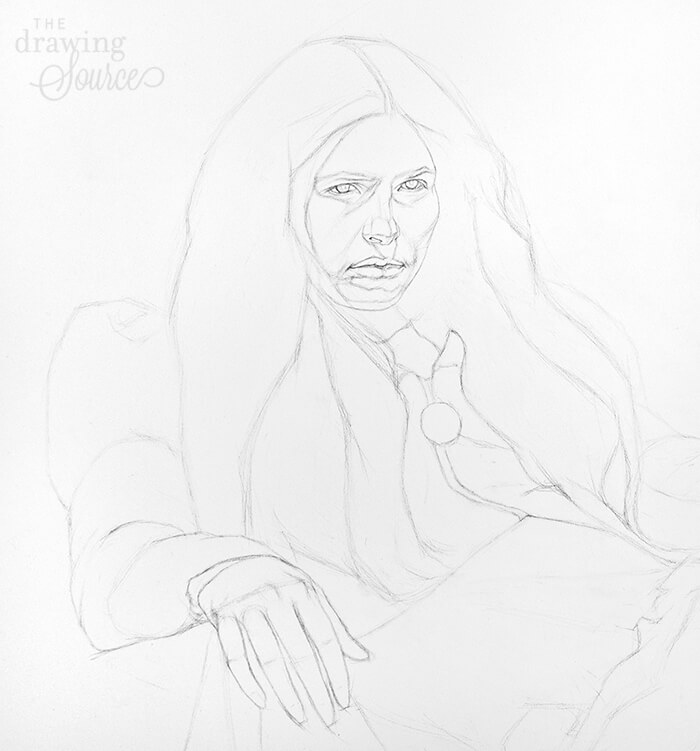
Because the focus of
this page is on how to draw hair, I'll begin with the face already blocked
in (drawn or constructed using line). (For a step by step tutorial on
how to draw the face, please visit this Portrait Drawing Tutorial.)
Simplifying the Complex and Creating Flow
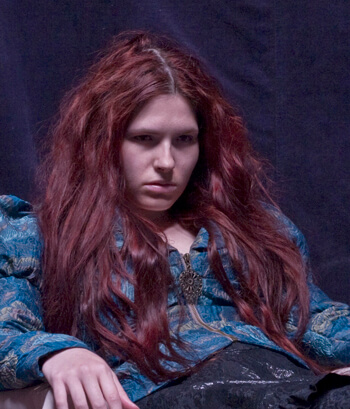
This drawing scenario is quite challenging. How do you go about drawing the hair when it is as busy and detailed as this?
Begin by finding the major sections of the hair by looking for:
-Major value changes and high contrast areas
-Changes in direction of the fall of the hair
-Major shapes in the hair (more on this later)
You can see what I considered to be the major sections of the hair below:
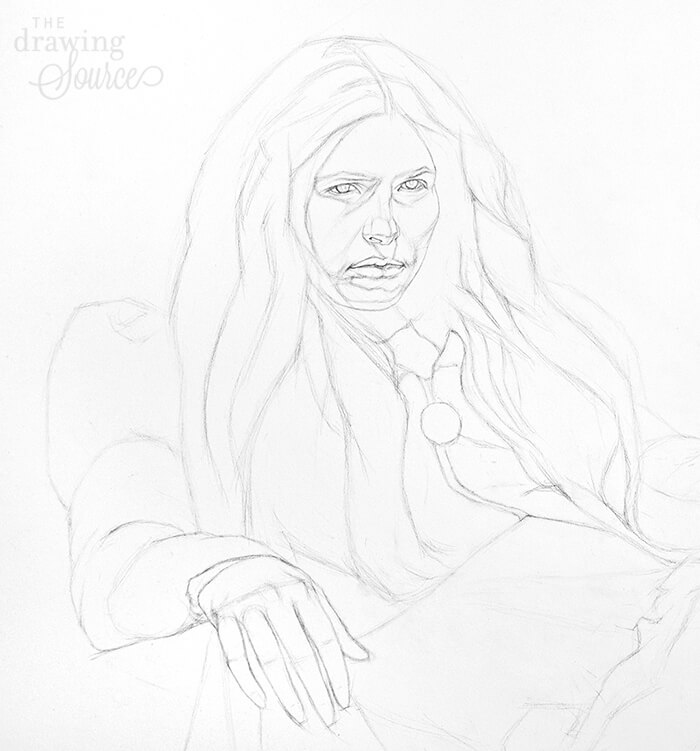
How to Draw Hair: Finding Gestures

Most
often I suggest to draw all block ins using straight lines. However, in
this case I am drawing the hair almost exclusively with curved lines
because I want to achieve a feeling of "flowing" hair right from the
beginning of the drawing.
When learning how to draw hair, one way to reinforce this flow and
interconnectedness while improving the accuracy of your drawing is to
look for gestures. You can think of gestures as invisible, curved
lines that flow from one element of a picture to another, creating a
kind of underlying structure that connects all the elements in an image.
In the above image, you can see that even though my drawn lines are not
literally connected, the blue line suggests how the eye might travel
from one to another. In this way, you can make sure that every line
visually leads to another line in the drawing.

This
is where I will stop working on my block-in with line. It doesn't make
much sense to go into more detail at this point because I will lose some
of my drawing when I start drawing in values. However, just because I
am moving to value drawing does not mean that the block-in stage is
over.
Setting Your Mindset and Goals for Your Drawing
It is always easier to get somewhere when you know where
you want to go. The same applies to drawing. When you have an idea of
what you want to draw or communicate (whether it is a particular look,
mood, atmosphere, etc.), that goal can guide all of your decisions.
That way, if you are ever unsure of what to do next, you can check in
with your intention and it will help you figure out how to continue.

I mention this because especially in this kind of drawing scenario, it
is easy to get caught up in details just because they are there.
Instead of becoming a slave to what is in front of you, let the goals
you set for your drawing dictate the amount of detail you draw, and when
your drawing is "finished".
For example: My tendency is actually to simplify hair, as I did in the drawing to the left for my previous portrait drawing tutorial.
(At the time of writing this) I have never drawn a portrait in which the hair is as important
as it is in this current scenario. So, my goals for this drawing will be to:
- Experiment with drawing more detail in the hair than I normally would
- Figure out how to draw hair in such a way that the viewer's eye moves through it, not getting "caught" in any one area
To
reach both of these goals, drawing every hair or curl that I see does
not have to be a priority. Instead, part of my challenge will be to
figure out how to design what I see. To decide which details are
important to include and which I can simplify or leave out of my
drawing. I want my pencil marks to be considered, conscious decisions.
How to Draw Hair...
That Actually Looks Like Your Model's!
If
you squint at this image (one of the most effective methods of
simplifying what is in front of you) you will notice that much of the
hair masses together, showing us how close in value it is.
The gradations in the hair are very subtle, especially when you compare them to the contrast in the face.
To simplify, I will start with the most obvious values: the lightest and darkest, and work my way to the most subtle.
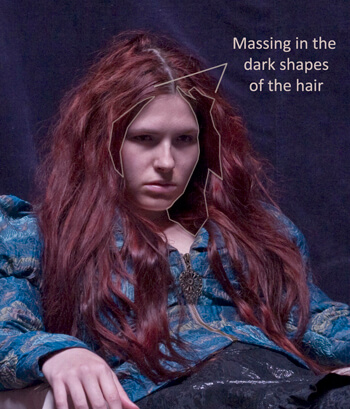
The
lightest value can be left as the white of the paper, and the darkest
value is just to the right of the face (our right, the model's left). To take this one step further, when I squint at the model I notice that
the darkest value masses together with the slightly lighter area of the
hair right next to it, creating a distinct dark shape.
Drawing the shapes specific to your subject creates a likeness.
This is true no matter what you draw,
whether it is a still life, portrait or figure.
Throughout this drawing I will be looking for shapes, beginning with general ones and moving towards more and more specific ones. I discuss how to use shape to create a likeness of your subject and present a shape exercise in Lesson 2 of my free Mini-Course.
It's worth
repeating: The specificity of shapes is what creates a likeness.
In the above image, I have drawn three steps:
- I massed in the two dark shapes
- I used vine charcoal and a soft bristle brush to draw a flat graphic shape for the rest of the hair
- I then drew the gradation under the chin, connecting the shadows on both sides of the face
I
am continuing to find and draw the dark shapes in the hair. This preliminary addition of tone can be considered the 'block-in' of the value stage. Everything I
draw is still tentative, subject to change, and there is no sensitive
rendering yet.
Looking at the bottom section of hair under the chin: All I have done
here is find the dark shape, find the approximate light shape with my
eraser, and slightly gradate in between the two. I haven't evened out
the values, yet it is already starting to look like dimensional hair,
especially when compared to the surrounding flat shapes.
This is a strategy I will use throughout the drawing: finding the dark
shapes, then the light shapes, and creating a gradation between the two to create
the half-tones. However, before I continue I should establish the rest
of the values in my picture by drawing the face.
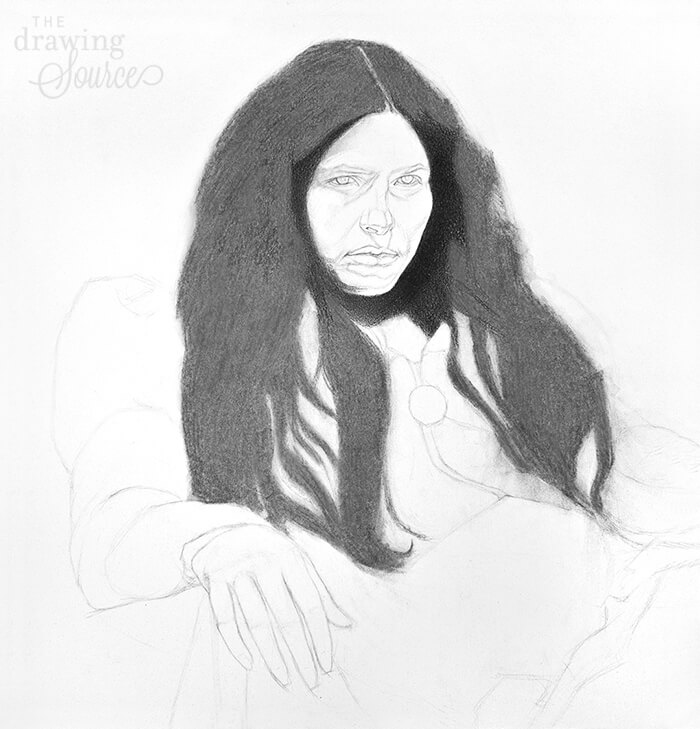
Rendering the Face
Since this tutorial focuses on how to draw hair, I will go through rendering the face in only a few steps. For an in-depth step by step tutorial on shading the face, please click here.
I begin rendering by massing in the shadows (remember: specific shapes = likeness!) From here I start creating gradations from the shadows into the half-tones.
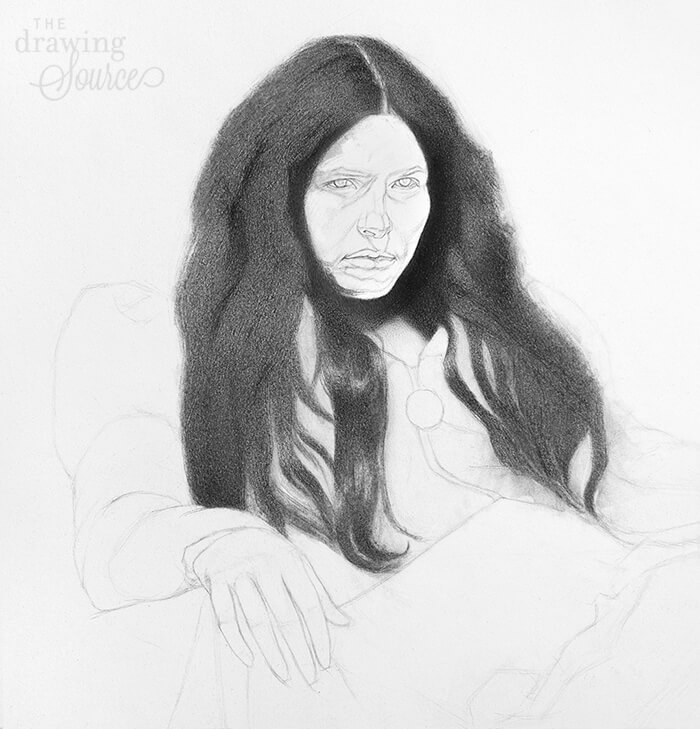
If you refer to the reference photo, you will notice that the left
side of the face (the model's left, our right), is generally darker than
the right side. This suggests that another way to begin rendering the face could be to mass in a light
value across the whole left side of the face before continuing to shade.
As
you can see, I tend to move around the face as I render. For example, I
might start with the hairline (which is often a nice soft edge to begin
shading from), move to the cheek, then the chin and so on, without
shading any one area to completion.
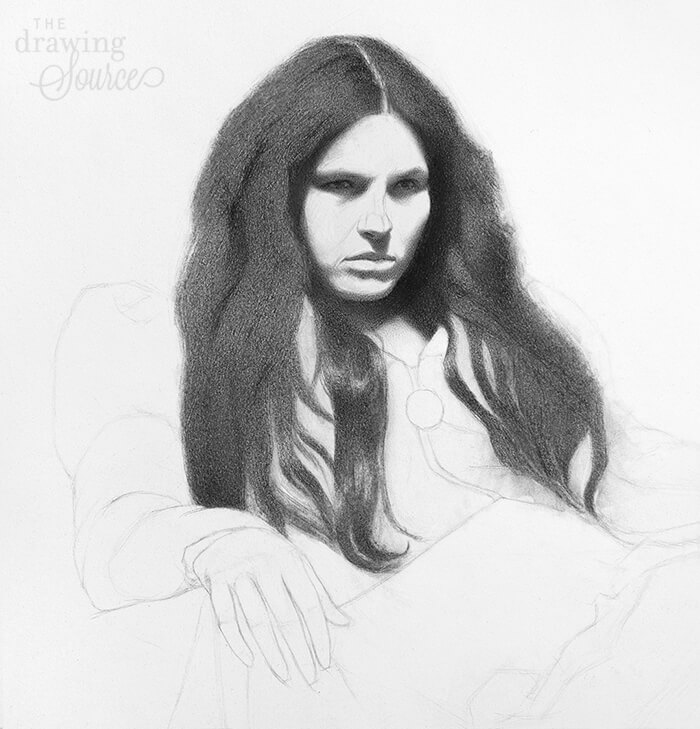
I do this so that I have more and more values to compare, minimizing my
chance of drawing inaccurate value relationships (not a clue what those
are? Read about them on the Value Drawing page or watch Lesson 5 of my free Mini-Course).

Now
that I have drawn the face, I have all the values to compare to that I
could ever need. This is a good time to step back from the drawing,
evaluate, and plan my next steps.
How to Draw Hair: Thinking of Hair as Form
To be convincingly realistic in a drawing:
1) The hair must describe the form of the head.
Let's face it, the form of the head is basically an upside down egg. No matter what the model's hairstyle, there is usually an area of hair that lies flat on the head and reveals the form. It is this area that is particularly important to pay attention to, otherwise the hair won't look believable, or the skull may look strangely shaped.
2) The hair must follow the same lighting pattern as the face.
For example, the light must look like it's coming from the same direction and have the same intensity or brightness throughout the drawing.
3) The hair drawing must convincingly represent the elements of light and shadow on form (such as the highlight, half-tone and shadow).
Not only
does hair describe the form of the head, hair can be thought of as form
itself.
Just as there are many ways to conceptualize the head when drawing a
portrait, there are just as many ways to conceptualize hair as form. For
example:
 How to draw hair: by viewing curls as cylinders
Hair
can be thought of as various forms depending on the hairstyle. For
example, some curls can be thought of as cylinders, and can be rendered
in much the same way. Notice that both the curl and the cylinder have a
highlight, halftone and shadow area. The core shadow on the curl is
somewhat obscured by its texture.
 How to draw hair: by viewing it as having planes
It
can be helpful to visualize hair as having planes, just as forms do.
In this example, the highlight shape of the hair is the plane receiving
the most direct light, and as the planes turn away from light they
become incrementally darker.
 How to draw hair: by viewing it as ribbons
Finally, you can think of sections of hair as ribbons that have a thickness and texture.
To keep yourself picturing hair as form while you draw, ask yourself:
- What form does this section of hair resemble?
- Where are the highlights, halftone and shadow areas on the form?
- How would you render the form that this section of hair resembles? The way you would draw that form is the way you should draw that section of hair. Once the structure of that section is established, then you can add the illusion of texture by drawing some of the individual strands.
The form of the hair should be your top priority. Texture comes last.
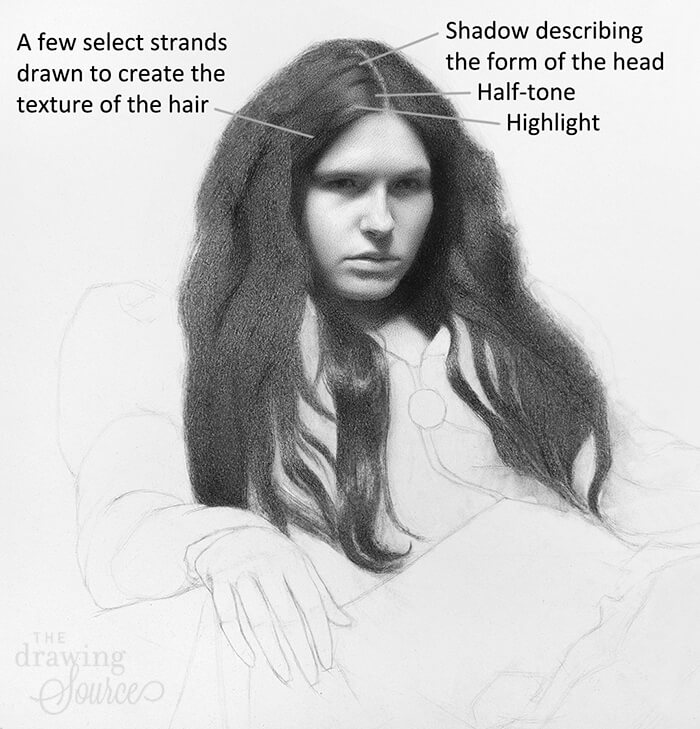
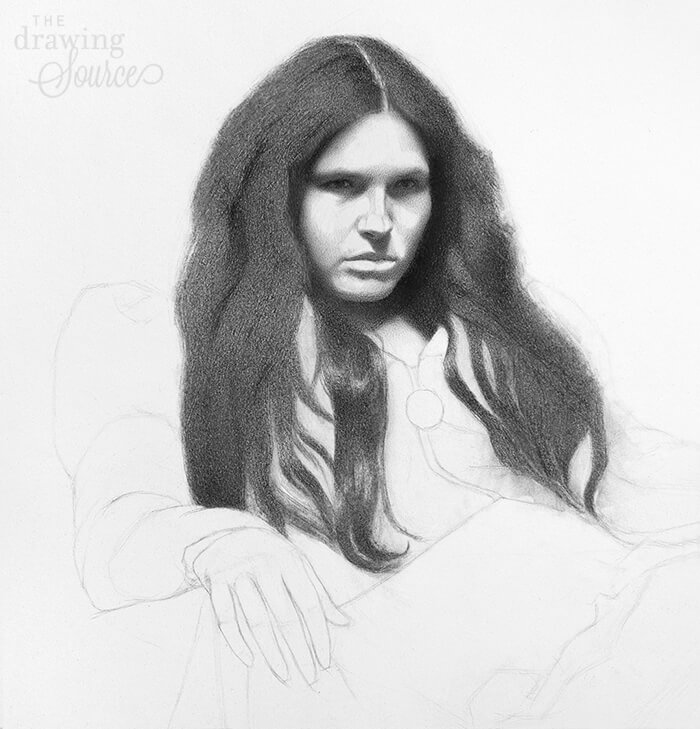
I
have rendered the hair at the top of the head, using both the form and
shape approaches discussed. (Notice that this is where the hair lies
flattest on the head, revealing its form.)
First, I drew the carefully observed highlight shape. Then I drew the
shadow shapes, because finding the half-tone (or middle value) is
easiest when you first have the two extremes: light and dark.
Finally, when I was happy with the overall form and 3D quality of the drawn hair, I drew
just a few individual strands to create the illusion of texture. Notice
how few strands I had to draw on top of the form to achieve the illusion
of hair.
Note: Notice that the left side of the model's face (on our right) is
slightly darker than the right side. To create the illusion that the
hair and face are being lit by the same light source, the left side of
the hair also needs to be darker than the right side.

As I continue drawing I look for "ribbons" of hair to indicate, usually with a highlight and halftone.

I
am working from general to specific as I draw the hair. For example,
about halfway down the hair on the left, light illuminates all three
sections of hair. In the step before this one, I noticed this and made
them all the same, lighter value.
In this step I looked more specifically at each section and defined the
shapes with highlights and subtle half-tones. Notice that while they
all look ribbon-like, they are not repetitive and each has a unique
shape and curve of its own.
I am using my kneaded eraser just as much as I use my pencil throughout this drawing. It's a fantastic tool for drawing hair because it can be used to pick out specific details, or to lighten larger areas of value. Watch this video tutorial on my three favorite kneaded eraser techniques for realistic drawing here.

I
am keeping the darkest values and highest contrast around the face. I
am purposefully keeping the lower half of the hair lighter because high
contrast and dark areas attract the eye, and I want to make sure that
the face remains the focal point, even with all of this distracting
hair.
How to Draw Hair: The Finished Hair Drawing

Here is the completed drawing!
Since the previous step, I have:
- Added a few specific highlights
- Evened out the values in the hair at the bottom right of the drawing
- Added individual strands of hair to reinforce the illusion of texture
- Worked on the contour of the hair
How to Draw Hair: Refining the Contour
It's important to break up the outside edge of the hair so that it's not
one continuous line, or the drawing will look like a sticker on the
page. Create variations in edge quality (softer and sharper edges) for
the most believable effect. (Watch Lesson 6 of my free Mini-Course to learn four techniques for drawing edges effectively!)
You can also draw slight gradations around a few areas of the outline,
as I have done, so that the hair doesn't end too abruptly. Finally, the
contour is a great place to have fun adding flyaway hairs!
I hope you've enjoyed this tutorial on how to draw hair! Don't miss the downloadable hair drawing tutorial infographic below, as well as this tutorial on how to draw a realistic braid.
Happy Drawing,
Downloadable Resources
Enjoyed this page? Please share it!
Share buttons and pinnable image below:

If you enjoyed this tutorial on how to draw hair, you may also be interested in...
Related Pages
How to Draw a Braid (Step by Step)
How to Start a Portrait Drawing (Step by Step)
How to Shade a Portrait Drawing (Step by Step)
5 Proportions of the Face to Know
3 Ways to Use a Kneaded Eraser for Realistic Drawing
Search site:


F R E E V I D E O & G U I D E
Improve your shading skills with this 4-Step Realistic Shading Roadmap!
By Marina Fridman COPYRIGHT © 2025 The Drawing Source. All Rights Reserved. Based in Canada.