- Home
- Drawing Tutorials
- Sphere Drawing Tutorial
Sphere Drawing Tutorial
Part 2: Drawing a believable background
The next stage in this sphere drawing tutorial is to draw a believable background for the sphere. Drawing a background is like setting the stage for your subject. A believable environment can make the subject itself appear more realistic and believable.
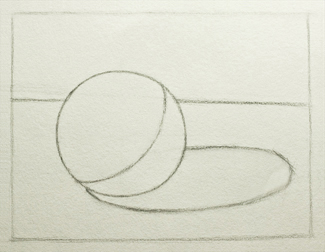
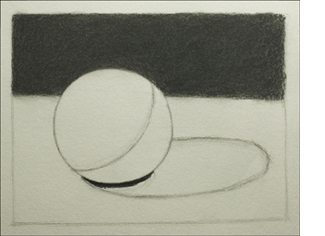
To review how to draw the block-in of the sphere shown to the left, return to Part 1 of the tutorial here.
F R E E D O W N L O A D
At the end of this article, download a free Step-by-Step Sphere Drawing Infographic!
Transitioning from Line Drawing to Tonal Drawing
As we transition from the block-in to this next stage of drawing, we also shift from thinking in terms of line drawing to thinking about tonal, or value drawing.
During the block-in, you looked at the sphere with your eyes wide open, so as to see the placement of the object and its subtle contours clearly.
To "set the stage" and draw the background, we will look at the sphere in a different way.
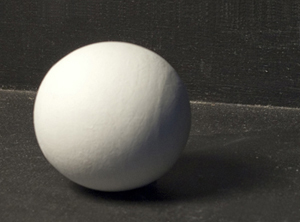
Give yourself at least a few minutes to put down your pencil and simply observe the subject. Begin by looking at the sphere with your eyes open, as you have done up to this point. Then, half-close your eyes (squint), and observe how the values change. Use questions such as the ones below to guide your observation.
Questions to ask yourself as you observe the sphere:
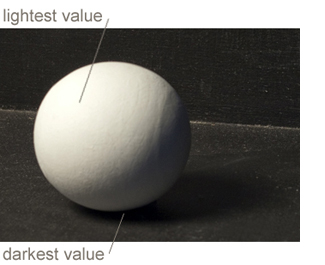
What visual information disappears when I squint at the sphere?
In my case, I can no longer see a sharp line where the back of the shadow box meets the surface on which the sphere rests.
Also, the core shadow darkens to the point that it merges with the background. Because of this, I can't make out exactly where the sphere ends and the background begins.
How does the contrast in the scene change when I squint?
The separation of light and dark becomes very noticeable. The dark values look darker, and the light values look lighter, which means that the contrast has increased.
Since the lit portion of the sphere looks much brighter,
it becomes the obvious focal point, while everything else becomes secondary.
Sphere Drawing Tutorial
How to Draw a Background for the Sphere
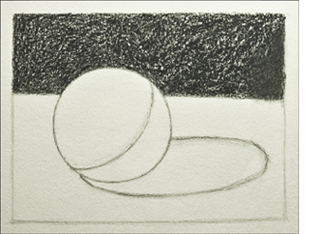
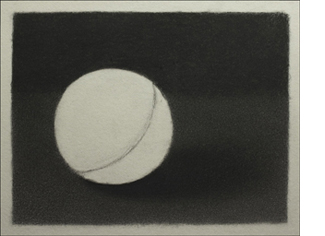
At this point in the sphere drawing tutorial, squint at the sphere to determine the value of the top portion of the background. Fill it in, beginning at the top left corner.
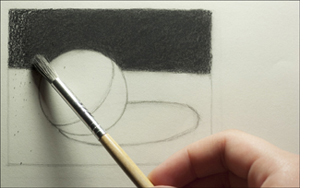
A bristle brush can be very useful for drawing backgrounds because it is an efficient way to even out large areas of tone.
Try not to take any one part of your drawing to a finish before establishing the values of the other areas. Without other values to compare to, it's difficult to determine how accurate you are, and
you don't want to have to lighten or darken an area that you have spent time evening out.
Determining Value Through Comparison
To determine the value of a certain area, compare it to other values in the scene.
The easiest values to compare to are white and black - the two extremes on the value scale.
We will consider white to be the white of the paper. To establish the
darkest dark, look at the sphere, squint, and check to see if there
are any truly black areas (value 9) in the scene.
When I squint at the sphere, I can see that
just below it, the occlusion shadow, is pitch black. I mark the darkest
portion of it, and I now have another variable, besides the white of the
paper, to compare to.
When I compare the occlusion shadow to the upper background, I notice
that they are almost the same value, and that I definitely have room to
darken the background.
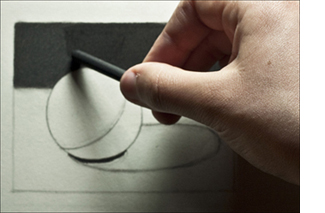
This is the perfect opportunity to use vine or willow charcoal, which will darken the background and even out the value simultaneously.
To learn about vine and willow charcoal and how to use them, visit the Using Vine and Willow Charcoal page here.
Continue working from left to right, and top to bottom on the remaining background elements.
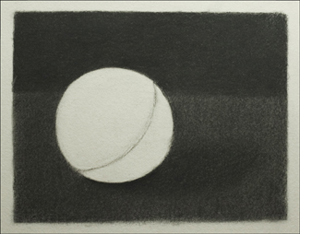
At this point in the sphere drawing tutorial, I
have filled in the cast shadow and the surface on which the sphere
lies, and evened them out with a bristle brush.
However, the brush doesn't usually create a perfectly even surface.
What is stopping my image from looking realistic (aside from the not yet drawn sphere),
is the unevenness of the charcoal application.
After you have brushed the charcoal, take a
sharp pencil and use the tip to fill in the spaces in the charcoal so
that they are the same value as their surrounding areas. (This is known
as rendering.) These spaces create unevenness in the values and are what break up the illusion of reality.
Now that the spaces are filled in and the surface is even, the stage, or background, for the sphere is much more realistic and believable.
Making Critical Decisions
Remember the questions we asked ourselves before drawing the background?
They greatly informed many of the decisions I made in this sphere drawing tutorial.
For example, I have not included any sharp lines in the background. I
have made the border between the back wall and the surface on which the
sphere sits into a very soft transition - the way I saw it when I
squinted at the scene.
I felt that there was no good reason to include this sharp line in my
drawing. Including it would only distract from the main subject of my
image the sphere. Sharp lines attract the eye, and I didnt want the
viewers eye resting on an element of the background.
Nothing should distract from the clear, intended statement of the picture...
Even if it is just a study of a sphere!
Continue to Sphere Drawing Tutorial Page 3: Shading a Sphere
F R E E D O W N L O A D
Get the Step-by-Step Sphere Drawing Infographic
(plus, get a weekly newsletter and access the Members-Only Drawing Resource Library)!
You may also be interested in ...
Return to Sphere Drawing Tutorial: Page 1
Search the site above


